
Scheduling and rounds: planning a day and optimising a technician's route, step by step
From dragging and dropping a work order to a route optimised on Google travel times: the illustrated guide to BL Next Scheduling, built on data from our demo company.

A technician's day is played out twice: once at the office, when you decide who goes where and in what order; and again on the road, when that order turns into kilometres and minutes. BL Next's Scheduling module brings these two moments together in a single screen. Here, step by step, is how to plan a day and then optimise its round — with real screenshots taken from our demo company "BâtiPro Services" and the round of Karim, a technician based in Lyon.
1. The Week view: the whole team at a glance
Open Operations › Scheduling. The Week view shows one team member per row and one day per column. Each card is a work order (OT) or a task, with its reference, address, status — and colour: orange for scheduled, green for in progress, blue for completed. The day's weather is shown at the top of each column, and a technician on leave has their day greyed out: nothing can be dropped there, either from the office or from the server side.
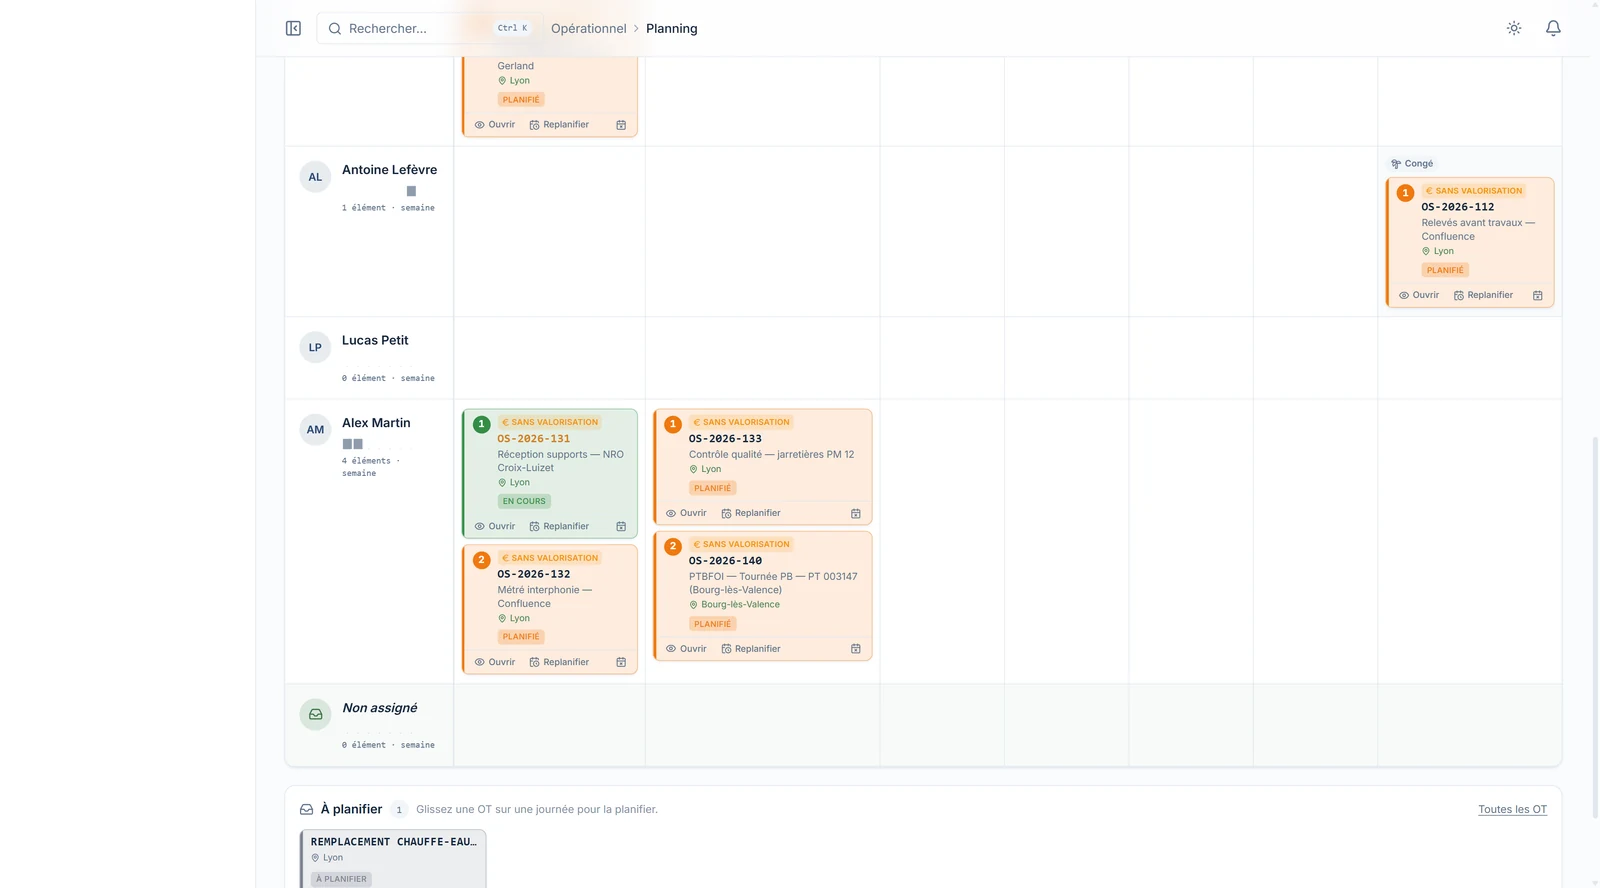
Below the grid, the "To be scheduled" panel gathers the work orders that don't yet have a day or a technician assigned. This is your queue.
2. Scheduling a work order: drag, drop, done
Take a card from the panel and drop it onto a technician's slot on a given day. The slot lights up green when the drop is possible.
On release, the work order takes on the date and technician of that slot, switches to scheduled status, and leaves the panel. The "To be scheduled" counter drops by one. No form, no intermediate confirmation.
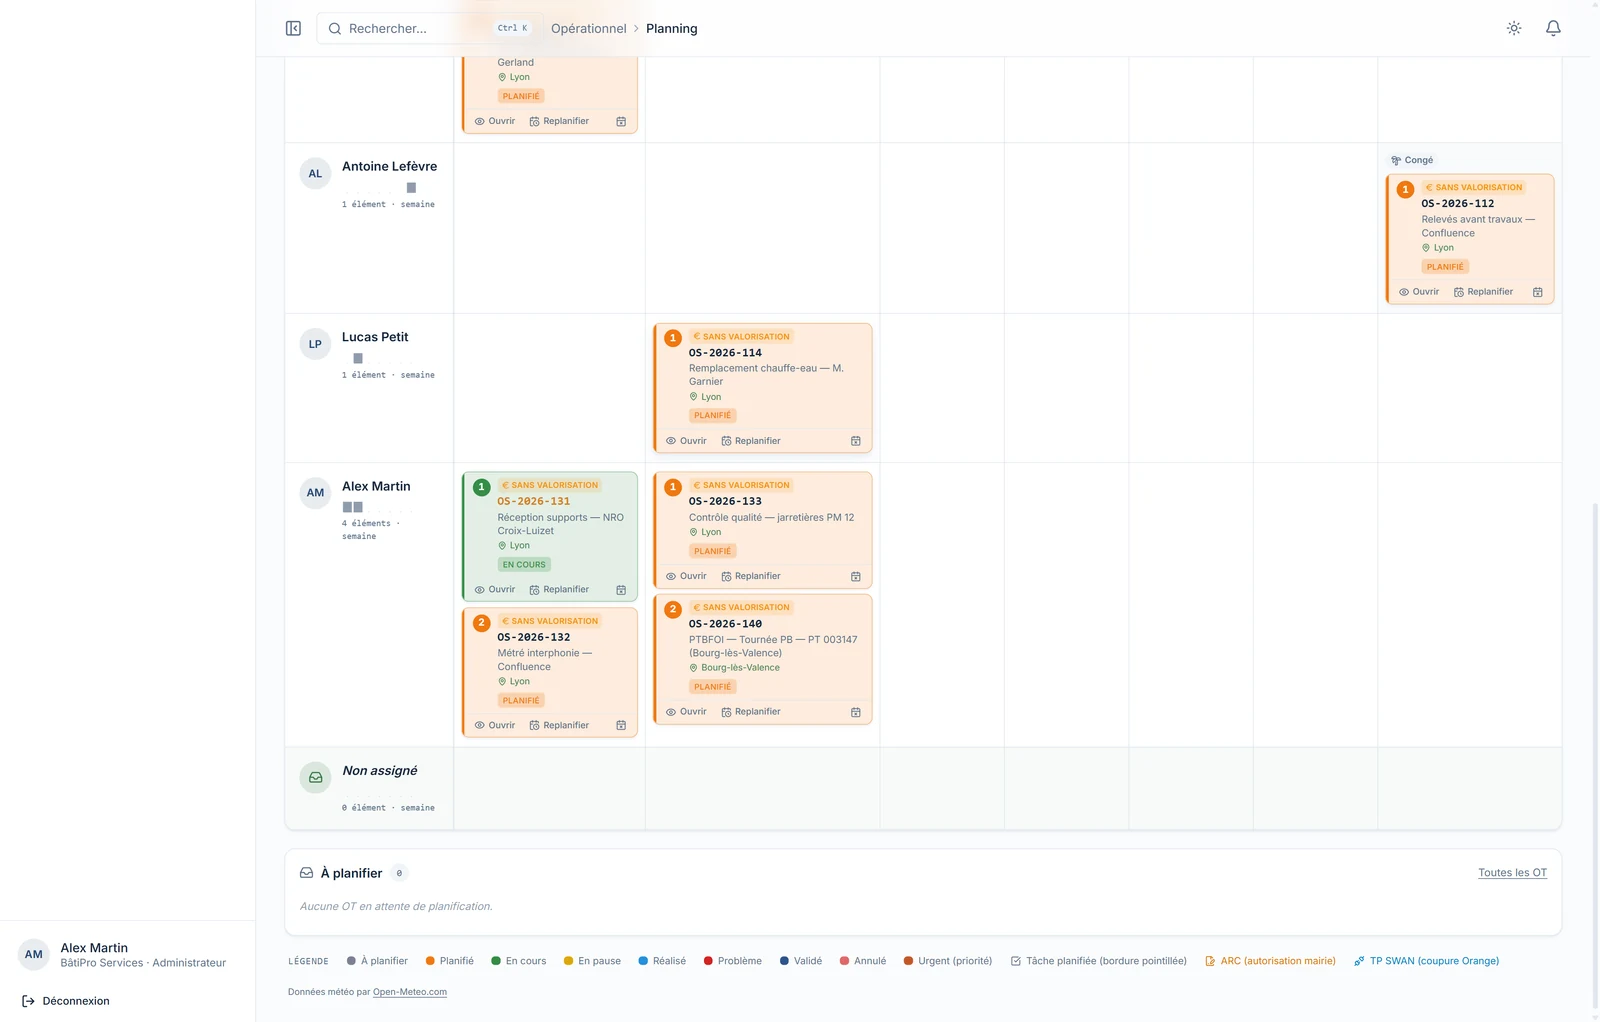
Need to set a time slot, a duration, or add support? The Reschedule button on each card opens the detail view. And to send a work order back to the panel, the crossed-out calendar icon unschedules it: it keeps its history, it just loses its slot.
You can also drag a card from one day to another, or from one technician to another: it's the same gesture.
3. The Map view: the day seen from the road
Switch to Map, then choose a technician and a day from the two lists on the right. The map recentres on their interventions, numbered in the planned order, and traces the route between them.
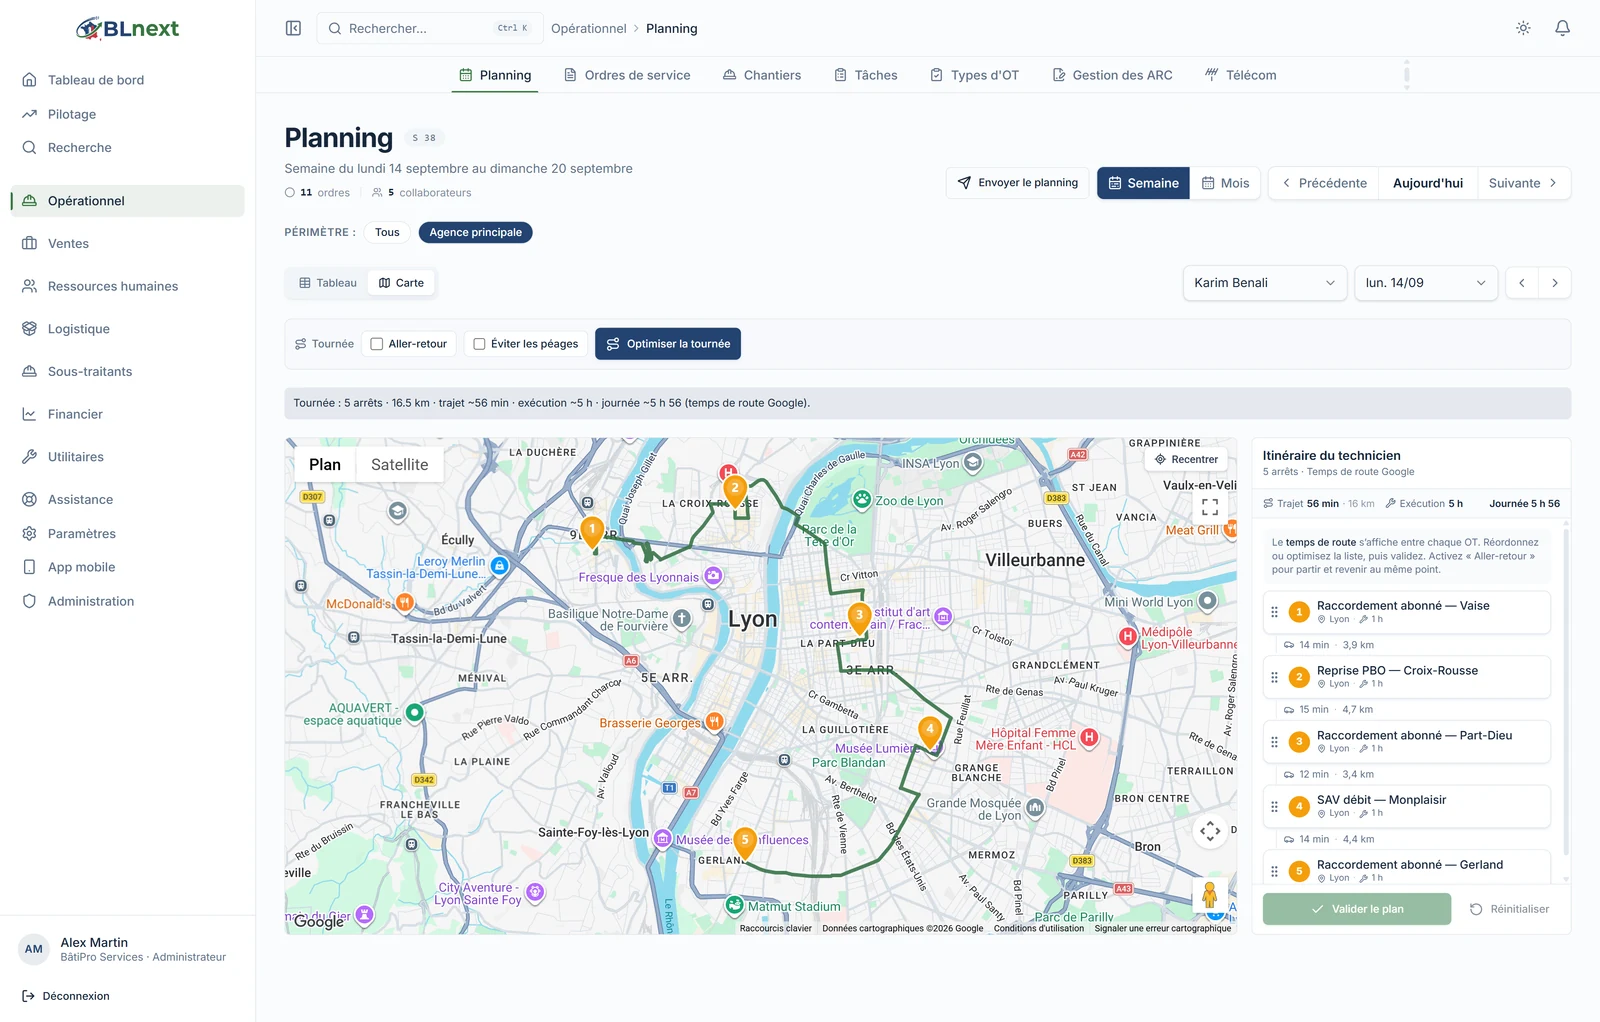
Three areas can be read from top to bottom:
- The Round bar, with the "Round trip" and "Avoid tolls" options, and the Optimise round button.
- The summary, in one line: number of stops, kilometres, travel time, execution time and total length of the day — here, 5 stops · 16.5 km · travel ~56 min · execution ~5 h · day ~5 h 56.
- The "Technician's route" panel, which lists the stops with, between each one, the travel time and distance.
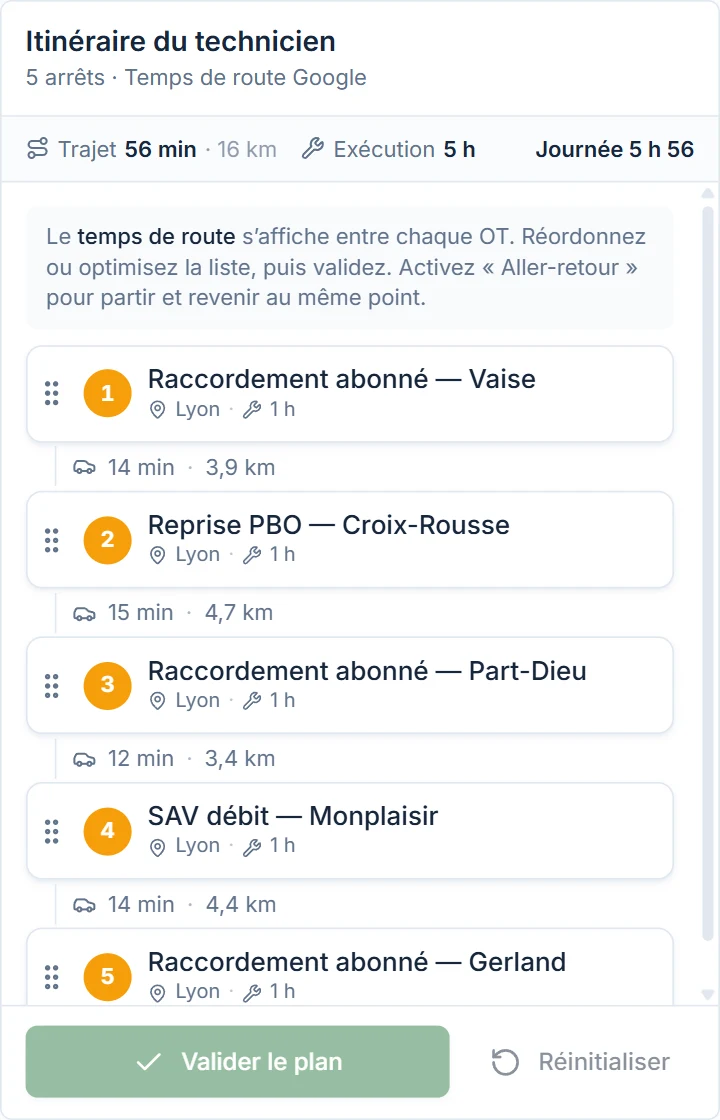
Travel times are Google's, as of the moment of calculation. If Google can't be reached, BL Next falls back to an open-source road calculation, then to a straight-line estimate — and the panel always tells you which of the three sources was used.
4. Reordering by hand
Each stop in the panel can be grabbed by its handle (the six dots on the left) and dragged to the desired position. Travel times are recalculated instantly, and the route on the map follows.
This is useful when a constraint isn't captured in the data: a customer only available in the morning, an appointment set over the phone. But this is also where unnecessary kilometres creep in. Here is the same day, entered in the order requests came in rather than in geographical order:
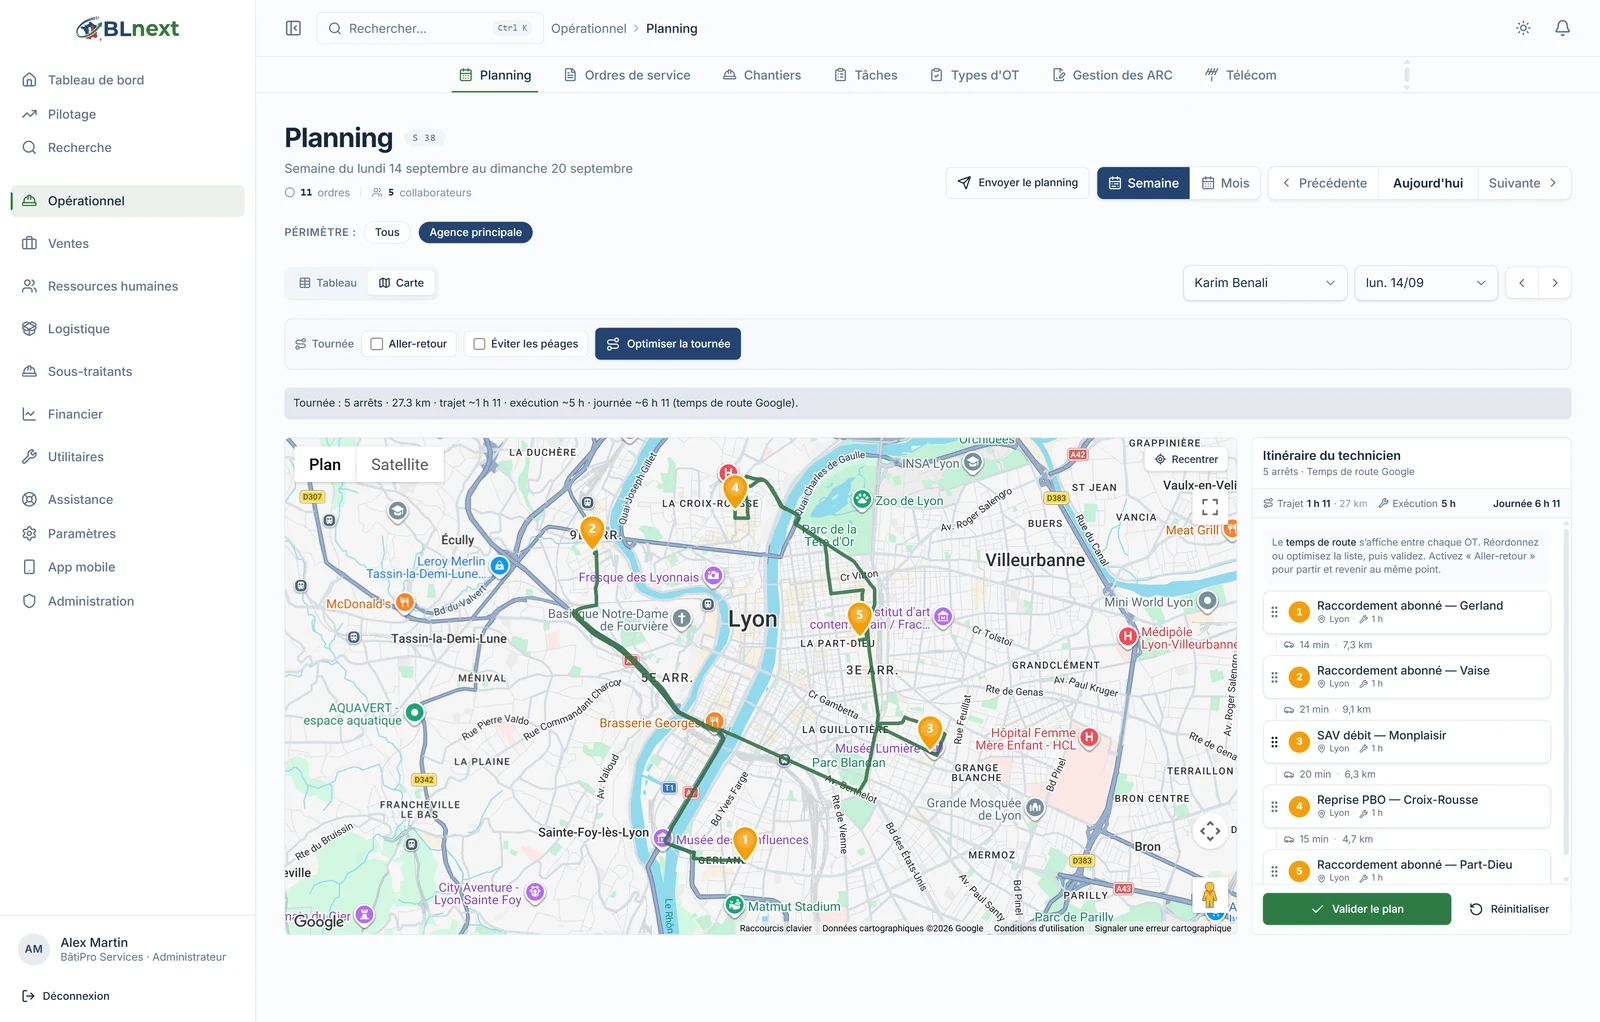
27.3 km, 1 h 11 of travel, a day of 6 h 11. Eleven kilometres and a quarter of an hour more than the previous version — for the same five interventions. Over a week, across a team, that's a technician spending their time on the ring road.
5. Optimising the round in one click
Click Optimise round. BL Next asks Google for the order of stops that minimises travel time between them, starting from the first one, then reorders the panel and redraws the route.
Result on our example: 17.1 km, 57 min of travel, a day of 5 h 57. Ten kilometres and fourteen minutes saved, without touching a single intervention.
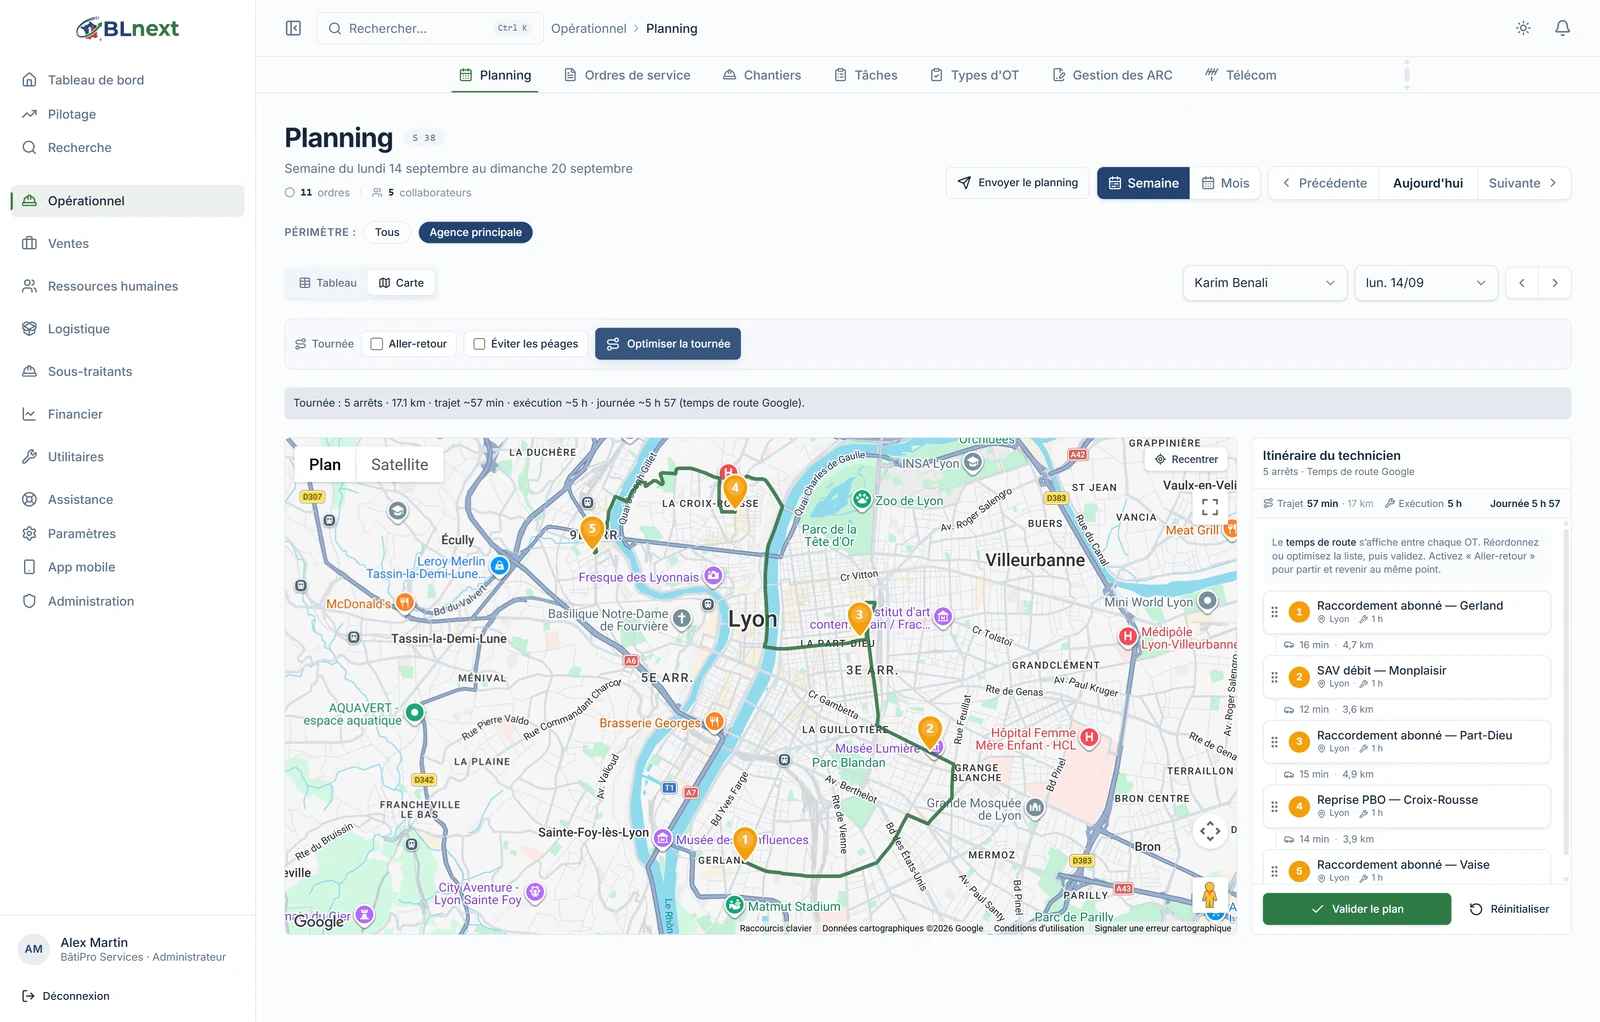
Optimisation only proposes a solution: until you click Confirm plan, nothing is saved, and Reset reverts to the saved order. Once confirmed, the sequence is what the technician sees in their field app, numbered exactly in that order.
6. Leaving and returning to the same point: the round trip
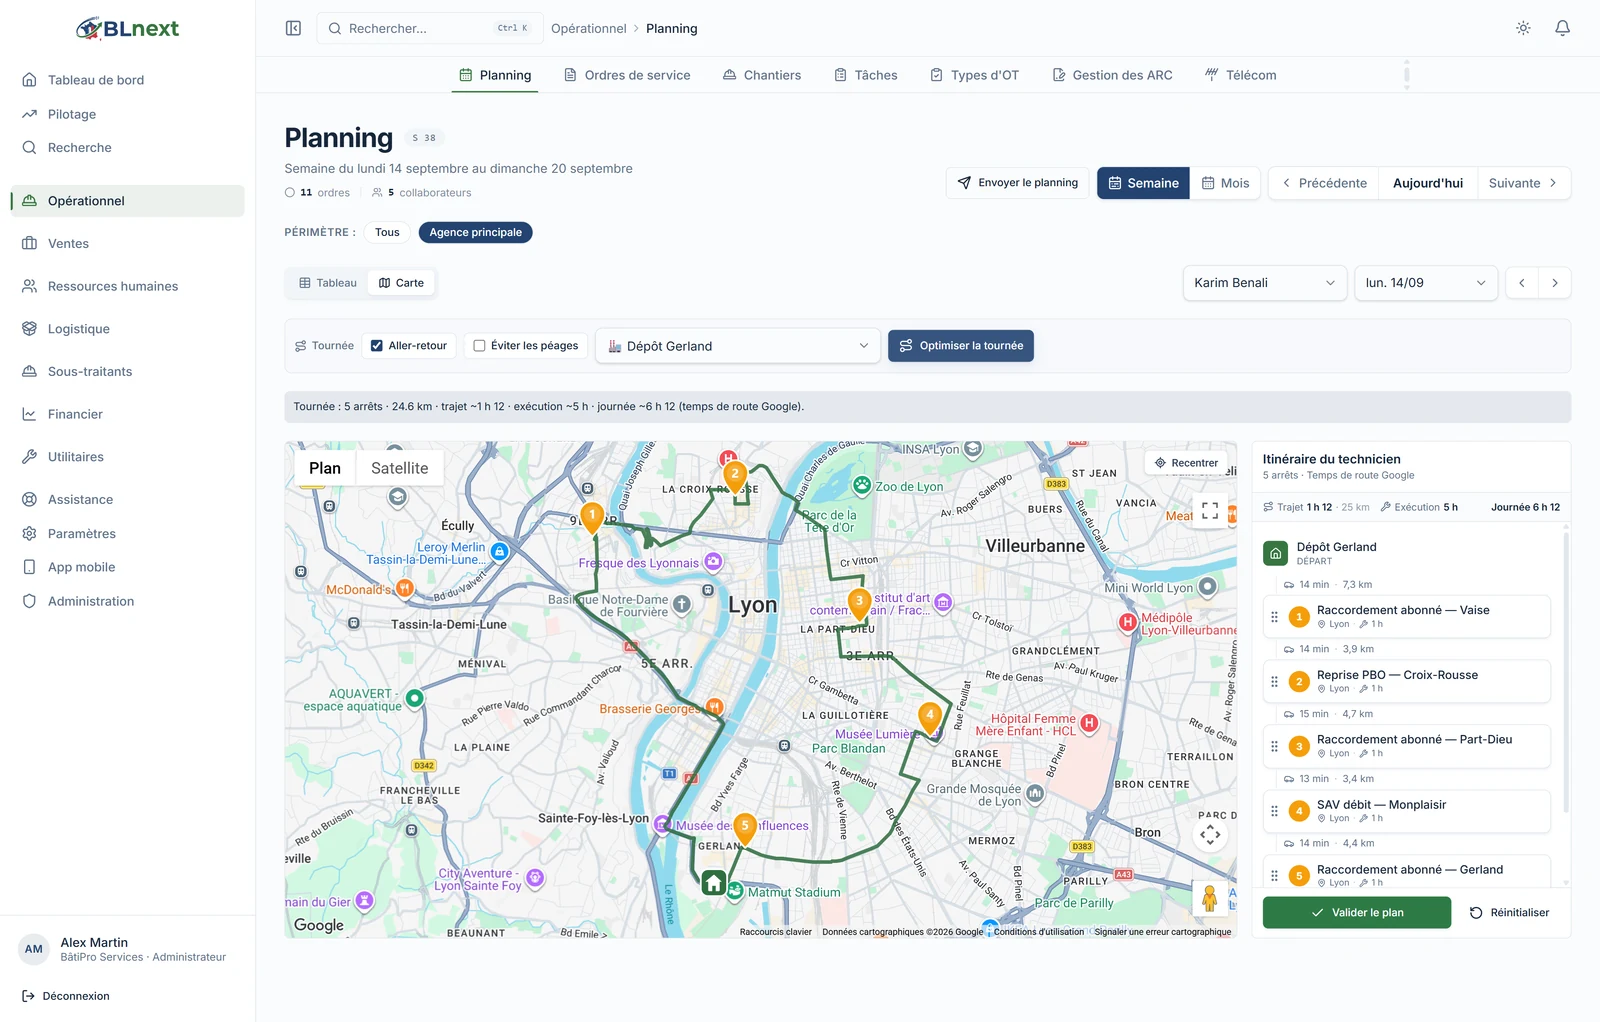
By default, the round is an open path: it starts at the first stop and ends at the last. Tick Round trip to turn it into a loop: a selector appears to choose the start and return point from among your geolocated sites — depot, branch, supplier.

The panel then adds the depot → first stop and last stop → depot legs, and the optimisation takes the full loop into account. From the Gerland depot, Karim's day becomes 24.6 km and 1 h 12 of travel: it's this figure, not the open-path one, that should be compared against actual fuel consumption.
7. Avoiding tolls
Tick Avoid tolls to favour toll-free roads. The journey may be a little longer, and the panel indicates this with the mention "no tolls". One honest caveat: only the Google calculation respects this option; if the route comes from a fallback, the panel warns you that the choice wasn't taken into account.

8. Sending the schedule to technicians
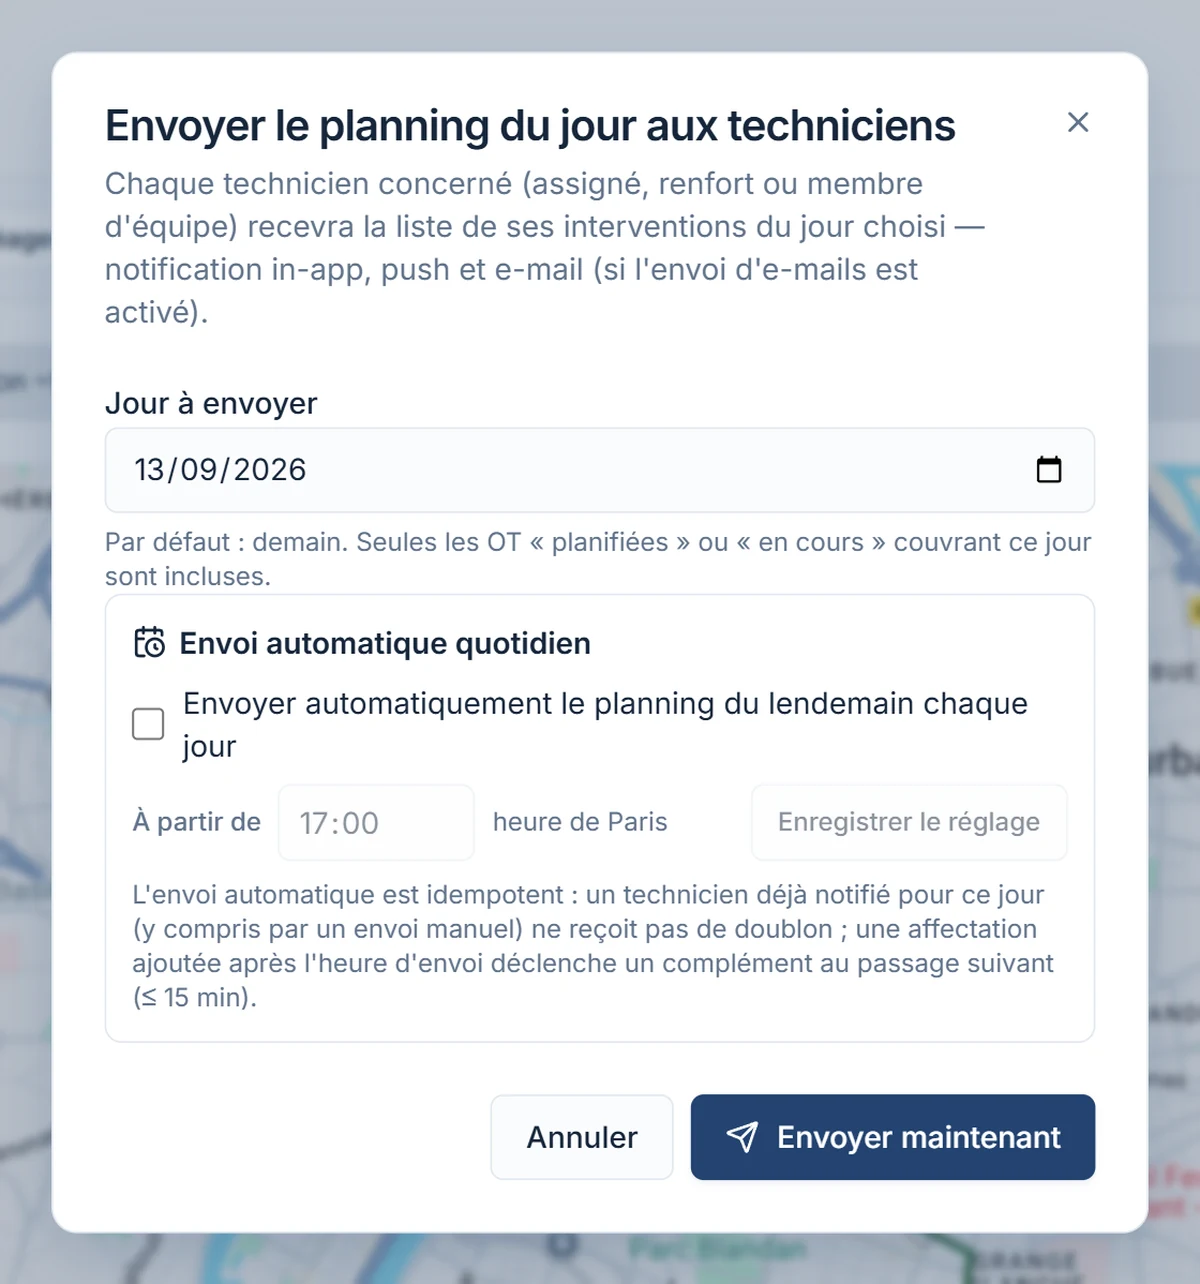
Last step, from the Week or Map view: Send schedule. Each technician concerned receives the list of their interventions for the chosen day — notification in the app, push notification, and email if you've enabled it. You can also schedule a daily automatic send, for example at 5 p.m. for the next day: a technician already notified doesn't receive a duplicate, and an assignment added after the send time triggers a follow-up within fifteen minutes.
What to remember
- Scheduling = dragging a card onto a slot. The status, date and technician follow.
- Look at the day from the Map view before confirming it: the summary gives kilometres and minutes, not just a list.
- Optimise, then confirm. The proposed order commits to nothing until it's confirmed; once confirmed, it's what the technician follows in the field.
- Round trip to measure the real day, depot included.
All the screens in this tutorial are from the demo company — you can go through each step yourself during your 14-day trial, no credit card required.